Monday, June 29, 2015

How I Created This Panorama with a Point and Shoot Camera

In previous posts, I've talked directly and indirectly about how your gear doesn't matter.  Don't be confused about I'm talking about - you definitely need some gear as a photographer, just like any other profession.  You can only do a task when you have tools.  But there's a difference between owning an oil filter wrench, and owning the latest osmium-infused, perfectly-balanced oil filter wrench that you just bought because you think the standard one isn't good enough for your new client's '67 GTO.

I took this panorama (Figure 1) of the Golden Gate Bridge with a Canon PowerShot.
Panorama of the Golden Gate Bridge
Figure 1
I deliberately chose not to use any pro gear to prove this very point.  Let's go step by step to see how you too can make a large-scale panorama in perfect focus with decidedly non-professional gear, and little or no software investment.  We'll start with the hardware and software, progress into the shoot itself, collating the images, and finally get into postprocessing.  By the time we're done, you'll see that, while it's easier to do this with a Hasselblad medium-format camera, it's not necessary.  Don't worry - the process is much simpler than this wall of text makes it seem.

The Gear

Here's what you'll need to get started:

Hardware:
Canon PowerShot SX-280HS, or any other small digital camera.

Panorama Stitching Software (pick one):
Microsoft ICE (Free, and highly recommended)
Hugin (Free)

Other Software (Pick one):
Adobe Photoshop ($10 a month)
GIMP (Free)

You'll also need a computer on which to run those software packages.  Judging by the fact that you're reading this, you most likely already have one.

Notice there's no tripod.  We'll be covering this later, but don't worry.  You won't have to prop the camera up against a doorframe.  Now grab your camera and go find a suitable panorama spot.  Let's get started.

The Shoot


  1. If you shoot this entire scene as one photograph, then crop it to a desirable ratio in an image editing program, you won't have a suitable panorama in the end.  It won't be of high enough resolution to print higher than about 2x8, depending on the camera you're using.  Panoramas are built by taking a number of shots, one of each part of the scene, then stitching them together to form the whole picture.  So with that in mind, we'll get the highest resolution pano by zooming in as much as we can (without using digital zoom - it's a lie), and starting the shoot that way. You should know your camera well enough to know when you've reached the maximum zoom allowed, without going over into digital zoom.  Find the entry about it in the manual if you don't know.  You'll probably get the best results using between 10x and 20x zoom, so keep that in mind if you have a camera like the Nikon P900, which has an absolutely insane 83x zoom.
  2. How about exposure?  We know that the most precise panoramas are best done with manual exposure, so that the camera doesn't guess a little differently between shots, and end up giving you some shots that are darker than others.  This behavior comes to light most obviously when you're shooting superzoomed, getting sky in one image, only bridge in the next, and then only a boat sail in another one.  The camera will guess differently for each of those types of shots, and that's not good.  For this particular shoot, I decided that the different shots wouldn't be enough different in exposure to worry about, so I let the camera decide.  I was also trying to keep it as simple as I reasonably could.
  3. Now that you're zoomed in, you'll be taking shot number one in your panorama.  Go to the upper left of your anticipated scene, and then move up and to the left a little more.  This will give you some room to crop later, which you'll need because the shots never precisely line up, and they'll line up a little less when you're handheld.  Always better to have too much in the scene and crop, than to have too little.  Our finished cropped resolution will be the same as if you hadn't included the extra, so there's no penalty for overshooting when shooting a pano.
  4. For that first shot, and every subsequent shot, take at least three frames in quick succession.  Whether you have to simply hold the shutter release button down, or press it several times, will depend on your camera.  You're taking at least three because we don't have a tripod, and we need to be sure we have at least one in perfect focus.  Having three will help ensure that this will occur, provided you're not in high winds or riding in a car. (Figure 2.)  If you want to take more than three, go for it.  
    Shooting in Stacks
    Figure 2
  5. Take overlapping shots, overlapping about a third of the scene between each shot.  Usually you don't need this much overlap, but I try to always have too much, because if you have too little, all your effort will be wasted if the stitching software can't figure it out.  Go from left to right, then come back to the left-hand side, overlapping about a third of the vertical from the first shot, and do the next row.  You may only have two rows, or you may have more.  It depends on the scene you're shooting, and your camera's ability to zoom. (Figure 3.)  It's also possible to take the shots in vertical (portrait) orientation, but since the end result will be in landscape, I find it easier to mimic that layout when shooting.  If you prefer the other way, go for it.  
    Shooting in Overlap
    Figure 3
  6. Once you've started shooting, do not stop until you're done.  If you put the camera down, you'll never know exactly where you were, and getting distracted is also a sure way to have a cloud cover the sun, making you start over.  I had 16 different shot positions for this panorama, with three of each position, making a total of 48 pictures.  
  7. After having taken all the shots, check them for focus by zooming in on the viewfinder.  If they seem close, with one or two of each set in good focus, you're done.  If they're all a jumbled mess, you might want to work on your handheld technique.  Notice that I didn't say this was going to be a cakewalk, I said it was possible.  It will take effort.  You may have to start over and work a little harder.

If the shots look good, you're done in the field.  Put all your gear in your shirt pocket, and let's go home and see what we can make out of this.

Processing


There isn't much in the way of processing, since you only have JPEGs.   For what we're doing, processing will mean culling the junk away so that the best images are left.

Transfer all the images you shot onto the computer, so that you can look at them individually.  If you have software that helps you do this, great.  If not, you can use Windows Explorer to view the directory you just dumped them in, and you'll need to look at every one of them to pick the best-focused shot from each set of three.  You're welcome to delete all the ones that fall short, leaving only one full set of well-focused images for use in creating the pano.  More than likely, you have JPEGs that came out of the camera, as very few small cameras shoot in RAW.  The JPEGs will have artifacts which we will remove later, so don't worry if you don't have RAW.  Professionals will almost always use RAW, because it gives much greater latitude in editing, but we won't have to deal with that here.  The tools you have will work just great.

No matter your organizational technique, make sure you have exactly one full set of images in a directory so that we can begin postprocessing.  Don't have anything else in that directory.

PostProcessing


There are three basic steps here - doing the pano, fixing any issues with the result, and making the whole thing look pretty.
  1. Open the pano software you chose, and follow the instructions to load the pictures you took.  let the program do its work, and very quickly you'll be presented with the result.  If you followed the instructions above, there shouldn't be any issue with what you see.  If there's a missed spot, then you'll need to go out and do it again, learning from that mistake.  If you know the shots are good, but the pano software shows oddities in the intersections between shots, then try other software.  Even the free software is exceptionally good, but always try something else if you don't get satisfactory results.

    The edges in the result of the pano software will look jagged, as in Figure 4.  Don't worry - we'll take care of that later.  Many pano software packages have the ability to straighten and crop images before they're saved.  If the one you've chosen has that ability, go ahead and use it now.  If not, wait until we open the image in an editor.  
    As it Looks in the Pano Software
    Figure 4

     
  2. Save that image as a TIFF, or other high-quality lossless format.  Don't use JPEG at this point - we've already lost some information by virtue of using that format to begin with, and recompressing it will only degrade the image further.  Once the image has been saved, close the pano software.
     
  3. The following steps are necessary for finalization of the image.  I won't go into detail about exactly how to do it for a couple of reasons.  First, the exact method varies between programs, whether you're using GIMP or Photoshop, and explaining each would take more time than we have here.  Second, I encourage you to experiment with the program you choose, to help you learn it more thoroughly.  I believe that's a great way to learn - get an outline, and fill it in by experimentation.  So let's continue.  Open the TIFF file in an image editor, and do these steps: 
    A.  Straighten the image
    B.  Crop it to a meaningful ratio, say 3:1 or 4:1, taking care to frame the result in the most meaningful way.
    C.  Adjust levels so that blacks are all the way black, and white are all the way white.  The camera most likely wasn't too good at this, so we need to fix it.  you're welcome to move away from this rule and not have any full black or whites, or even blow out the black or whites.  The final choice is up to your taste.  But know the "rule," so that you know why you're breaking it.
    D.  Clone away any imperfections that bother you.  These may include ghosting from the pano software, people, trees, or any other imperfections.
    E.  Remove the artifacts caused by the camera's JPEG compression.  In a shot like this, the color range and brightness range is quite limited, because of the fog.  This exacerbates the JPEG artifacts.  The best way to do this is with noise reduction, provided you don't use so much that you lose detail.  It can also be helpful to add a little noise to the image at the same time, reducing the eye's ability to see the imperfections.  See Figure 5.  You can tell that the result isn't perfect, but it's a darn sight better than what we started with.
    The Result of Noise Reduction and Grain Addition
    Figure 5
      
  4. The final step for me was adding a color gradient filter (black into brown into yellow) to change the feel from fog to sunset.  Spend some time adjusting where the three colors fall in the brightness spectrum to get the best result.  There's no rule here - whatever you feel is the most aesthetically pleasing is the right way to do it.
End Result
Final Panorama
Final Panorama - Figure 6

The size of this image at 300 dpi is 10x40 inches, and if we print it at 150 dpi, still perfectly okay for a large panorama, we get 20x80 inches.  How big your image is will depend on how many shots you took and the resolution of each shot.

Not only would I be proud to display this image, I'm actually selling it at shows right now.

And you can do the same thing!

Friday, June 12, 2015

Four Denver Car Shows You Might Otherwise Miss

At some point in our journey of discovering the wonderful world of automobiles, most of us get tired of seeing ordinary cars with decals, and the same old treatment of the same old cars over and over... and over.  Surely there must be more shows featuring more interesting cars, higher-quality builds, and an overall reason to come out and be excited.

The number of shows in Colorado is truly staggering.  But because there are so many, they often tend to melt together into exercises in futility, at least if one's desire is to see something different.  I don't mean to put down people's individual cars, so I won't mention any specific makes or models, but we've all seen way too many of certain cars, built using the same ideas as everyone else, showing not only little imagination, but also a level of skill that seems increasingly disappointing. 

Let's see what else we can find.  Here are a few shows that I feel have shown consistently that they have something unique to offer:

1.  The Colorado English Motoring Conclave, September 19 and 20, 2015.  Oak Park, 64th Place and Oak Street, Arvada.  From what we see on the streets one might think there are only about a dozen British automobiles in the Denver area, but this show consistently pulls over 500 cars every year, and it's been going on for over thirty years.  Many of these cars are taken out only two days a year - for this show.  The attention to correctness and detail is often wonderful.  You'll get to see cars you've previously only read about.

2.  O'Reilly Auto Parts Creme de la Chrome Show, November 27 - 29, Colorado Convention Center, Denver.  This show is famous for the incredibly high quality of entrants.  It's also comfortable, being one of the few indoor shows in Colorado.  Past shows have included Ridler and Great 8 winners, magazine cover cars, movie cars, and great examples of extremely rare rides from all periods of automotive history.  Local builders know they have to work hard, since cars come here from all over the country, and they're not here to mess around.  If you win Best of Show here (The Chrome Award), you've got bragging rights for the next decade.

3.  Carnage on Larimer, August 29, Larimer Street in Denver between 30th and 33rd.  Three blocks of pure fun, displaying street cruisers from several subcultures as one big family.  And I do mean family.  Everyone is welcomed here, and you can strike up a conversation with a perfect stranger just as though you were brothers.  Here you'll gain a new appreciation for cars you don't see at mainstream shows.  These cars reflect the personalities of their drivers, often with a wry and self-aware sense of humour.  This is the true old-school spirit of hot rodding.

 4.  High Plains Raceway Open Lapping Days, Fridays and some Thursdays all Summer long,
93301 East US Highway 36, Deer Trail.  Okay, so this isn't a car show per se, but it's the logical extension of appreciation.  A great time, and a perfect way to actually legally race your own car on a real, race-used 2.5 mile long course.  A professional, knowledgeable track staff and pits you can camp in (if you need to) combine with the adventure of racing with people just met, totaling up to an unforgettable experience.  It'll be much more fun than when your cousin tried to race his Corolla down Lookout Mountain and ended up rolling it six times.  Many car clubs also race here on the weekends, which should encourage you to join one with fellow owners.  See their calendar for details.


Do you think I've shortchanged your favorite show?  Let me know!

Sunday, June 7, 2015

Why Your Gear Isn't Important

Have you even seen a magnificent race car and thought "Wow, I'll bet that builder has a great socket set"?  How about watching a quarterback win the Superbowl?  Did you ever mention to anyone how meticulously the team must have chosen his mouth guard?  Or maybe you've read a Steinbeck novel and thought how masterfully he maintained his typewriter.

Obviously, you've done none of these things, and neither has anyone else.  But photography, along with any art or profession that deals with technologically advanced tools, is quite prone to having both its members and the public at large dependent on the thought that the gear makes the result.

It does not.  It has not ever been that way, and it shall never be.

In every case, the skill of the artisan defines their worth.  Now don't get me wrong, it's necessary to have tools.  You can't take a telephoto shot without a telephoto lens.  You can't replace spark plugs without a socket set, and you can't write a novel without a writing utensil of some kind.  But to think that you must have a speech-to-text app, or a certain kind of pen, or specific software to format your layout before you can write your Great American Novel is not just a misplaced notion, it's detrimental to your being able to move forward with your work.

In the era of being able to use the Internet for instant communication, there are many crutches available for people trying to learn a craft.  Discussion groups pop up daily for every conceivable profession, hobby, and interest.  But when there tend to be instant answers, we tend to depend less on ourselves, and more on the supposed experience of others.  It's somehow easier to ask a question and depend on the random ranting of a stranger than to find out for ourselves and retain that knowledge forever.  For audio engineers, Gearslut.com is one of those crutches.  For photographers, it's Photography-On-The.Net.  Neophytes trying to gain a lifetime of knowledge and skill in one easy step, and plenty of people with a few years of their own experience ready and eager to make themselves look like professionals in front of their peers.

Almost invariably, new questions will result in an anonymous stranger saying that the new camera just purchased is junk, or that only by changing brands can true enlightenment be achieved.  Anyone who uses Brand F of lens is obviously an amateur, when Brand K is the only tool Real Professionals(TM) ever use.

So let's get this out of the way right now:  Brand Is Not Important.  For photographers, whether you use Nikon, Canon, Sony, Hasselblad, Pentax or any other brand is absolutely, completely meaningless.  That's certainly not a popular view, particularly when you see the most revered an in-demand photographers using Hasselblads almost exclusively.  But you need to remember that they select their tools for very specific needs and purposes.  When you're shooting for a billboard, maybe you need a $45,000 Hasselblad because you won't have to extrapolate pixels.  Or maybe you won't need one when you get to that level.  Maybe you'll like the way a different brand behaves in your hands.  The point is that only YOU can decide, based on your specific direction.  No one else can tell you that direction, and no one else knows your needs. 

But your needs aren't based on what you think will make you better.  They're based on what will make your job easier.  No one looks at the nails a carpenter pounded in and says "Oh, he must have had a Stanley hammer!"  So why do they say such ridiculous things when referring to a photograph or an audio recording?  It's because the Democratization of technology has caused people to think they know something, when in fact they do not.

Here's a shot I took while in Uruguay.  It was taken with a point-and-shoot Pentax Optio S6, with a crushing 6 Megapixels, before cropping.  It's just a touch under 6MP after cropping:

Shot of old car taken in Uruguay
The End of Time
A couple of years later, I ended up selling this shot, blown up to 20 by 24 inches, for full price to a customer who still displays it. 

Let's look at another example, shot for Motorcycle Classics Magazine:
Vincent HRD shot for Motorcycle Classics
Gene Brown's Vincent HRD
This shoot was done with a Nikon D90, a seven-year old camera that shoots 12 Megapixels.  Not only was this particular shot used for a full-page spread, editor Richard Backus said that this was one of the highest-quality shoots he had ever seen.  While I'm proud of his comments, I'm not using them to tell you that I'm wonderful.  I'm using them to tell you that you can get great shots no matter what camera you're using.  Take a look at this contest for iPhone shots, and see how skillful these people are.

The masters of any craft had very little in the way of tools.  They took their time in choosing them, but sometimes were forced to use poor tools by today's standards, even if those tools may have been the best available at the time.  But often, they were some of the worst available, since that was all they could afford.  And yet, they each decided to not be limited by them.  Rather, they worked through and around those limitations.

If you do the same, you'll find yourself to be a much better artist.

Sunday, May 10, 2015

Lazy is Better for Taking Good Photographs!

One forgotten key

No matter how much or how little gear you have, you can instantly take better pictures, starting in the next ten seconds.  Here's how to do it:

Only take a quarter of the pictures you're now taking.

That's all there is to it!  With the advent of digital technology, cloud storage, quick editing and endless sharing possibilities, it's so tempting to take more and more that we tend to think not of quality, but of quantity, always hoping that at least one picture might end up better than the rest.  When you decrease the shooting frequency, you force your brain to think more about what it is you're shooting, and how best to take advantage of lighting and composition.  You don't even need to know lighting and composition rules - your brain will help you find the best picture of that waterfall if you know you'll only take one, instead of four.  Or forty.

Will this help you take great pictures?  Well, maybe.  Let's use the reduction method as the first step.  You'll never have  great shots when you get home if all you do is spray and pray.  In addition, you won't have enjoyed the trip if all you're doing is snapping pics, whether it's with an expensive camera or your phone.  Enjoy your surroundings, and live your life.

Once you've decided to take fewer shots, try this as well:  Try to take only ONE shot of any given object or view.  No one wants to see ten shots of anything, and you'll find later on that they're not all that different from each other anyway.  Taking those ten shots prevents you from thinking about the single best shot, and you'll probably end up missing it.

If you're at a car show, you don't need (or want) four angles of every car.  Pick only the finest or most interesting cars, and take just one shot of each, finding a different angle each time.  This will tell a different story for each car.

When taking pictures for posting on Facebook, remember that there are over 250 BILLION pictures on there, with over 350 million being added each and every day.  You cannot compete for the attention of your friends by posting volumes.  You'll have to do it with quality, and with small numbers.

No get out there and slow down your shooting!

Wednesday, February 25, 2015

Garden of the Gods

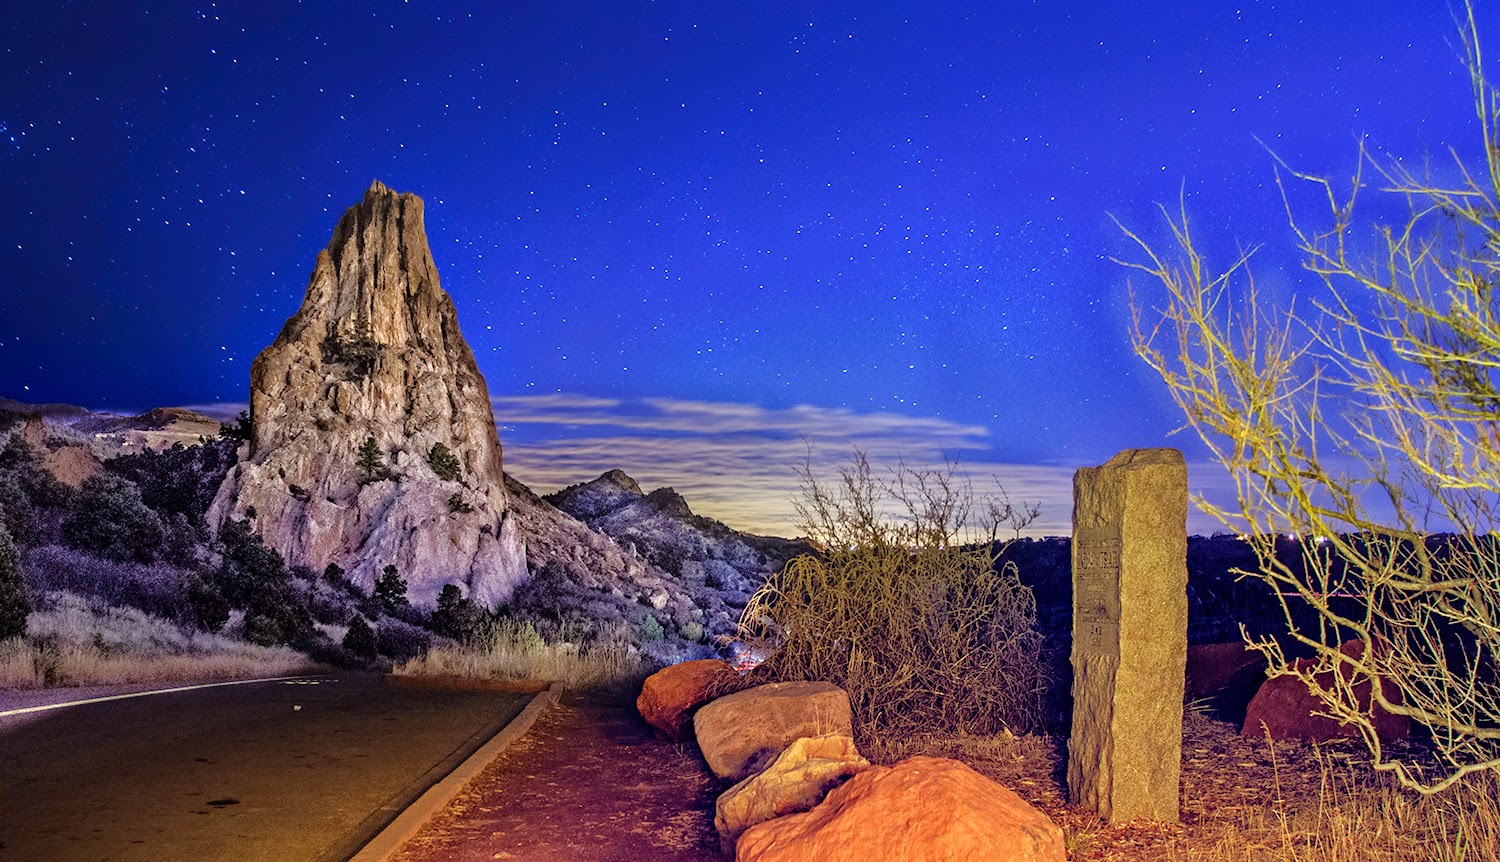
As part of a much larger project, I just got back from a visit to Garden of the Gods in Colorado Springs.  But I didn't go during the day - in fact, I went at 2:00 in the morning, trying to get the moonlight just right.  I wasn't altogether successful, as even a tiny sliver of Moon was too much.  Fortunately, I miscalculated how long the hike would take me, and I got to the hilltop before the Moon even came up.

But even before that happened, I took a shot on the roadway to the South of the main formations, looking North across the short side of one of them.  As someone else's car drove in the distance, I got this shot:


As you can see, even at 2 in the morning, there's a great deal of light coming from the city.  So much that it tends to block out most of the stars, as well as the ultimate goal of my shoot, the Milky Way.  Every bit of light you see is from the city, as the Moon hadn't yet come up.

Having gotten that shot, my next task was to hike to the secondary location to try to get the Milky Way behind the main formations.  Hiking with a bunch of camera gear and a 13 million candlepower lantern isn't all that easy, but I still made better time than I was hoping.  I got to my scouted location just before the Moon rose, and got this shot, which just happened to have an eagle-shaped cloud looking like it was ready to land on Pike's Peak:


The brightest light, just above the eagle's wing, is Jupiter.  Right after this shot was taken, the Moon started to come up, and ruined what little darkness was present.  I hiked back down, never having used my huge lantern, and returned to the car to continue my journey to other locales that same night.

See you next time!

Wednesday, February 18, 2015

Shae and Jon


Shae had been attending BYU-Idaho online from her original home in Idaho, but had been convinced by her sister and brother-in-law to come down to Colorado.  Colorado has all the beauty and grandeur of Idaho, but throws in some civilization and sophistication to boot – what’s not to love?  Well, it turns out that being Assistant Manager at a chain restaurant may not have so much to love, but everyone has to start somewhere, right?

It wasn’t long before Shae had seamlessly integrated herself into the local Colorado Mormon community, and met a number of great people at a movie night being hosted by one of the church members.  Among those was Jon, a transplant from West Jordan, Utah.  They immediately hit it off as friends, spending time getting to know each other during more church activities before the unmistakable spark of romance was felt. 
For Thanksgiving, Jon and Shae went to her family home in Idaho, and then to his family home in Utah, where a plan was afoot.  During a walk through Temple Square to an intimate gazebo, Jon proposed to Shae, presenting her with a ring exactly like one she had looked at dreamingly while window shopping.

Fast forward just two months, and the wedding plans are being put together!  And Shea’s long since moved on from the restaurant job, in so many ways.


Based on the timeline we had available, I knew the timing for this shoot would be tight.  One of their favorite places is Daniels Park just South of Denver, with which I’m quite familiar, so no scouting was necessary.  We scheduled to go out right after her work day was over, but there was a slight delay when we needed to pick up crucial portions of one of her outfits.  

We arrived at the Park just before Golden Hour, so we still had time to catch the light, but there was no time to go over what we wanted to do – only time to start shooting.  Knowing that some variables might come into play, I had used the previous several days to plan out the shots we would need, so the session started right away. 

I brought my full-frame camera and a 50mm prime lens as my primary, and left my backup crop-frame and several other lenses, along with two tripods and two 800WS radio strobes and stands, in the car.  It would be a quick matter to go back and get them if needed, but none of it would weigh me down for what needed to be a fast-moving shoot.

And fast it was!  We breezed through six locations before noticing that the light was now quickly disappearing.  The Sun had just barely dipped below the horizon, giving us a perfect chance for some silhouettes before the color in the sky went away.  I ran back to the car to get my backup camera and a 24-120mm lens, as I wanted to get farther away from Shae and John, to allow for more zooming in on the horizon.  The rest of the shoot was spent switching between cameras to get different effects from the same poses.

Even Molli, Jon’s longhair Dachshund got involved, posing dutifully while being teased with bologna, and then resting quietly in John’s truck during the rest of the shoot.  All in all, we accomplished a great deal in a short period of time.  I never used my strobes, as the natural light was changing so quickly there was no time to get them set up, and they weren’t really necessary anyway with all the wonderful colors present during a Colorado sunset.

It’s a privilege to be a part of Shae and Jon’s world, and I’m so grateful that they chose me to help them remember one of the most significant turning points of their life together.  I wish them all the best in their journey.

Sunday, October 5, 2014

The 1968 Mustang GT500KR

Being arguably the most popular muscle car in history, most aficionados will know that there were many high-performance badges bestowed upon the Mustang throughout its tenure.  The more noticeable would be the Boss 302, Boss 429, GT350, and GT500.  But there were other enumerations as well, labels which wouldn't make it so much into the popular vernacular.  The GT350H is a good example, as it's more special than the GT350, but many people aren't that familiar with it.

Even more special than the GT350H is the Cobra GT500KR, a designation awarded only in 1968, though it was later resurrected in 2008 and 2009.  The marque was so well-regarded that it took Carroll Shelby returning to the Ford fold to bring it back.  During the decades that Ford destroyed the spirit of the Mustang, not even they dared call anything else a GT500KR than a real Shelby.

It was known as "The Ultimate Mustang," and the official literature claimed that the Cobra Jet 428 would put out 335 to 360 horsepower, but that was a ridiculous marketing ploy in order to be able to put a real racing engine into a production car. 

The real number was certainly over 400 horses, with the engine being a hotrodded version of the previous Police Interceptor, with large ports and better exhaust.  Ford was proud of its recent wins in 1966 and 1967 at Le Mans over Ferrari, and boasted with the term Cobra LeMans diecast into the valve covers.

Production was limited to 1,053 fastback GT500KRs, with only 530 being ordered as 4-speeds.  Special Yellow was a very uncommon color, with only 44 being order with the WT6066 paint code.  Only 10 had air conditioning.  And finally, only one was sent to the SouthWest.  This is that car, which has finally found its way into the hands of Brian Nielsen, and into our camera.

According to Autotraderclassics, the GT500KR is not only one of the most sought-after cars in history, it's so rare that most are trailer queens, living out their days in a hermetically sealed box, never feeling the wind on the open road.  Not so this car.  Brian does indeed drive it.  We were not lucky enough to get permission to drive it ourselves though, so Brian can remain safe in the rarified air of being one of only a handful of people in the world who have had the experience of driving this legend.

Special thanks go out to him for allowing us to shoot it, and for the rare times when he agrees to show it.  It's a wonderful example of the way we used to treat the experience of driving.